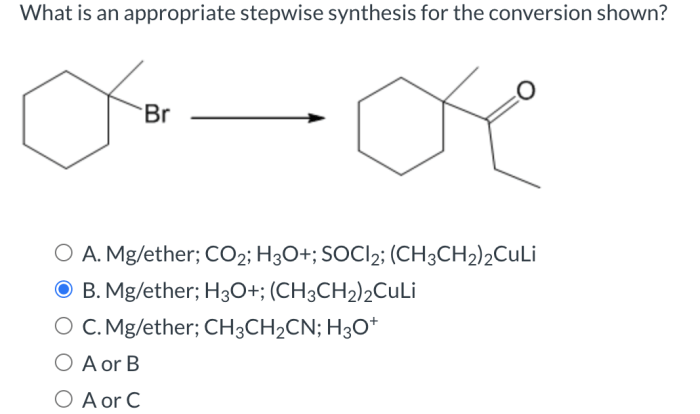
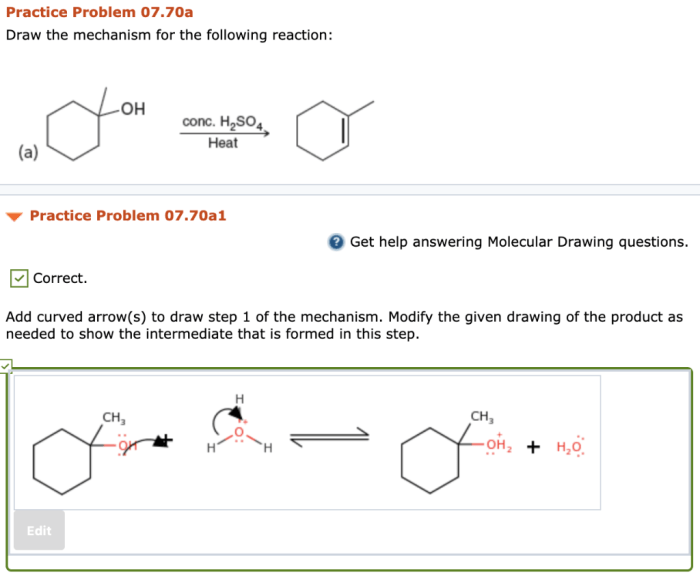
Embark on a journey into the realm of organic chemistry mechanisms, where curved arrows play a pivotal role in unraveling the intricate dance of electrons. Delving into the intricacies of add curved arrows to draw step 1 of the mechanism, this guide empowers you with the knowledge to accurately represent the electron flow in organic reactions, laying the foundation for a deeper understanding of chemical transformations.
Through a systematic exploration of curved arrows, you will gain insights into their purpose, significance, and diverse types, equipping you with the tools to decipher the language of organic chemistry. Step-by-step, we will dissect the first step of a mechanism, identifying the reactants, products, and electron flow, while simultaneously demonstrating the proper placement and direction of curved arrows to accurately depict the electron movement.
1. Overview of Curved Arrows

Curved arrows are a powerful tool in organic chemistry for visualizing the movement of electrons during chemical reactions. They help chemists understand the mechanisms of reactions and predict the products that will be formed.
There are two main types of curved arrows: single-headed and double-headed. Single-headed arrows represent the movement of a single electron, while double-headed arrows represent the movement of two electrons.
2. Step 1 of the Mechanism
The first step of the mechanism is the formation of a new bond between the electrophile and the nucleophile. The electrophile is an electron-poor species, while the nucleophile is an electron-rich species. The new bond is formed when the nucleophile donates a pair of electrons to the electrophile.
In the specific example we are considering, the electrophile is the carbonyl carbon of the ketone, and the nucleophile is the oxygen atom of the hydroxide ion. The new bond that is formed is the carbon-oxygen bond of the alcohol product.
3. Adding Curved Arrows to Step 1
To add curved arrows to step 1 of the mechanism, we need to show the movement of the electrons that are involved in the bond formation. The curved arrow should start from the nucleophile and end at the electrophile. The arrow should also have a head that indicates the direction of electron flow.
In the example we are considering, the curved arrow would start from the oxygen atom of the hydroxide ion and end at the carbonyl carbon of the ketone. The arrow would have a head that points towards the carbonyl carbon.
4. Table of Curved Arrow Notation
| Type of Arrow | Electron Movement | Example |
|---|---|---|
| Single-headed | Movement of a single electron | :C->O |
| Double-headed | Movement of two electrons | :C::O |
| Fishhook | Movement of a lone pair of electrons | :C-> |
| Half-headed | Movement of a radical electron | :C.-> |
5. Advanced Techniques: Add Curved Arrows To Draw Step 1 Of The Mechanism
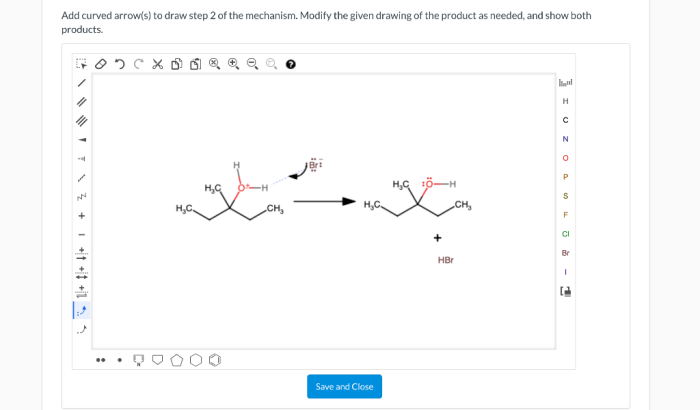
Curved arrows can also be used to represent more complex mechanisms, such as those that involve resonance structures, intermediates, and transition states. In these cases, it is important to use curved arrows to accurately depict the electron flow and the changes in molecular structure that occur during the reaction.
FAQ Corner
What is the purpose of curved arrows in organic chemistry?
Curved arrows in organic chemistry mechanisms serve as a visual representation of electron movement, allowing chemists to depict the flow of electrons during chemical reactions.
How do I determine the direction of curved arrows?
The direction of curved arrows follows the movement of electrons, from the electron source (nucleophile or base) towards the electron acceptor (electrophile or acid).
What are the different types of curved arrows?
There are two main types of curved arrows: single-headed arrows, which represent the movement of a single electron pair, and double-headed arrows, which represent the movement of two electron pairs.